![]()
What makes a PLC special? PLC's are used to automate machinery in assembly lines. For our project, we use the computer link feature that allows a PLC to take commands and communicate with a host computer. If something goes wrong with the computer link, the PLC still functions and protecting valuable equipment.
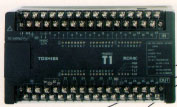
High Resolution Fly's Eye
experiment, uses a Toshiba
T1 PLC as part of a
steerable laser system used for
monitoring
atmospheric clarity. We use a model
TDR116-6S. The
PLC was
purchased as part of a starter
kit.
Specifically
the PLC is used to open and close a cover that protects the a steering
mechanism
when the systems is not used. It is programmed to
automatically
close this
cover after one hour unless it has received and instruction from the
main PC to
keep the cover open. This means that even if the PC or
network
communication to the site fails, the cover will still close.
It
is also
used to power cycle equipment, including the laser and the radiometer.
This PLC and most others use a language called relay ladder logic programming. However, if you've programmed in high level languages before don't be fooled by that last part. Ladder logic is not necessarily difficult. Once you get the hang of it it isn't hard at all. But.. ladder logic is quite different from more common programming languages such as FORTRAN or c. It's true that ladder logic uses conditional statements, subroutines and FOR NEXT loops but there are some very significant differences.
Unlike FORTRAN or c, with ladder logic, every 'rung' of the code is multithreaded. Normally in a programming language things happen in order. The command or line of code on top is executed before the command on the bottom until you hit the end of a loop. This is not so in ladder logic. Everything happens at the same time.
So what is ladder
logic programming really like? Ladder
logic
programming looks, well, like a ladder. It's more like a flow chart
than a
program. There are two vertical lines coming down the programming
environment,
one on the left and one on the right. Then, you have rungs of
conditionals on
the left that lead to outputs on the right. For example:
x0001 x0002 Y0001
In
Ladder logic programming you
do not have variables, you have
registers.
There are four kinds of registers: X's that are inputs, Y's that are
outputs,
D's that are data that can form interger, hex and real numbers, and
finally R's
that are internal relays. X's and Y's are pointers to the
actual
terminal
strip connectors (what you use a screw driver on to connect wires) on
the PLC.
If you energize an input, let's say 5, then X0005 will have an on
status; also
if you give Y0023 an on status then relay 23 will flick on. R's are
just about
the same as X's and Y's except that they don't point to any hardware.
They just
hold an on or off value inside of the PLC's memory. R's can be useful.
X's Y's
and R's can even hold data besides their on and off states on many
PLC's, but
personally I don't recommend it. For data like integers and hexadecimal
numbers
D's are used as their addresses.
|---| |-----|/|---------( )-----|
| |
| |
| x0001 Y002 |
|---| |--[01000 TON T012]--( )--|
| |
| |
| R001 |
|--[D0140 = 0001]--------( )--|
| |
| R001 Y004 |
|--| |---------------------( )--|
| |
|-{END}-------------------------|
example one. The things you will probably use the most writing Ladder Logic are the relay conditionals --| |-- ---|/|--- and the output coils ---( )---. These three things basically make up a kind of IF THEN statement. This --| |-- means closed if energized while --|/|-- means closed if not energized. The output coil --( )-- basically means then energize this. So the first rung of example one means that if input 1 is energized and input 2 is not then energize output 1. You should note that on the T1, the number of a particular input or output is written on the case of the PLC but for T2's and for some other more advanced PLC's this is not necessarily the case. To find out what the addresses of your inputs and outputs are you should refer to the documentation that came with your PLC. Also, in most ladder logic programming environments you have to specify the address of each of your inputs and outputs before it will even let you start programming. [the T series can auto configure]
delay timer. What this means is that after a specified amount of time after x0001 turns on, y0002 will turn on. You should note that because of the nature of ladder logic you can not simply put a timer attached directly to the left hand side without a relay conditional between it. Remember, everything is happening at the same time. PLC's are meant to run on their own for long periods of time, so you can't just tell it that 10 seconds after it's first plugged in it should activate something. You have to tell it to start timing after something in the outside world has occurred, like the energizing or de-energizing of an input.
In the code --[01000 TON T012]-- there is the parameter 01000 that tells the timer to wait 1000*10ms or 10 seconds, and the parameter T012 tells the PLC which internal timer you want to use. Some of the more advanced PLC's have timers with different accuracy. Most measure time in 10ms intervals but others measure time in single milliseconds. You should check the documentation on your PLC to see if any of it's timers measure time in different units than the others. Also you should not use the same timer for more than one thing.
On rung three of the ladder we have a conditional statement. If the number stored in D0140 is equal to 1 then energize R001. If you look at the entire circuit you'll note that there is no where else in it where D0140 is mentioned and you should know that all data registers are set to 0 at default. You may think that D0140 will never actually reach the value of 1 and that R001 will never be activated and that rung three and four are useless garbage code. It's true that during the normal operation of the PLC D0140 will never change from zero and the last two rungs before end would be useless. However, this is where the computer link function comes in. All Toshiba PLC's have a computer link protocol built into them. This allows a host computer, such as any sort of DOS, Linux based PC or even a Unix administrator with an RS232 serial port to send commands to the PLC while it's running and read or write values into its registers. This includes data, inputs, outputs, and relays.
Suppose that Y004 was attached to equipment that you wanted to turn it on or off at your pleasure. Suppose it was an air conditioner or maybe some strange contraption that brought you a coke from the fridge to your seat at a computer. If you can write a program at your own specialized system that can send ASCII characters with 8 data bits 1 start bit 1 stop bit and 9600 baud rate with odd parity, then you can manipulate the registers in the Toshiba PLC's and toggle d0140 between 1 and zero or 1 and any other value. See more about the computer link function with a sample C program written under Linux latter. C example
The final rung on the ladder
the -{END}- is basically what it says.
It's the
end statement. It doesn't really do anything except to say, well, your
done
programming. However, no program will work without an end statement and
the PLC
will ignore any code put in after an end statement. This shouldn't be a
problem
for small programs, just look at the screen and make sure the end is in
there
and at the bottom. If you happen to be making a very large and a very
complicated relay circuit your editor will likely force you to write it
in
separate blocks. Before attempting to write a very large program you
should go
to the very last programming block available to you and put the end
statement
there and no where else. The end statement can be used in debugging by
ending
the program early and disabling commands that fall after the end
statement.
| X001 Y001                                             Y001 |
|-| |---|/|---[01000 TON T002]-[01000 TOF T003]---------( )--|  rung one
|                                                            |
|  X001                                                 Y002 |
|--| |----+---------------------------------------------( )--|  rung two
|         |                                                  |
|  Y002   |                                                  |
|--| |----+                                                  |
|  X001 R006                                                 |
|--| |--|/|--[01000 TON T004]-----+-------[D150 + 1 -> D150]-|  rung three
|                                 |                     R006 |
|                                 +---[01000 TOF T005]--( )--|
|                                                            |
|                                                       Y003 |
|-[D150 >200]-------------------------------------------( )--|  rung four
|                                                            |
| Y003                                                       |
|-| |-----------------------------------------[ 0 MOV D150]--|  rung five
|                                                            |
|--{END}-----------------------------------------------------|  END rung
Example two is a bit more complicated than example one, but once you understand it you'll be on your way to being able to design your own relay ladder logic. Rung one is especially interesting. A TON and a TOF combination that lets output Y001 cycle on and off for 10 seconds at a time. While TON waits a given time before allowing an energized input to affect an output, TOF waits a given time before de-energizing an output after it's input has been cut off.
Let's analyze the rung. The -| |- conditional with X001 is there for good programming, it isn't actually necessary in this rung but if it's not there you have no way to stop the oscillating of Y001 during the PLC's operation. Now notice that we're not allowing current to flow if Y001 is energized yet the output of this rung is to energize Y001. Well, if Y001 is off then current is passed to TON. After TON has gone through it's specified time it will energize Y001. Now that Y001 is energized current to the rung is cut off. Once the current has stopped TOF will keep Y001 powered for a specified amount of time before Y001 feels the affects and de-energizes. With Y001 de-energized TON is energized again and the cycle goes on. (You may want to reread that last sentence a few times) The output Y001 stays on for a second, then off for a second continuously cycling.
Rung two shows how to set up a push button. With a momentary push button, the input is only energized for a short amount of time, but often it is useful to keep the rung on long afterwards. What you should notice about rung two is that the output is connected to the left hand side twice. If either of the two relay conditionals are on, then the output is on. Notice that one of the relay conditionals is the output itself. Thus if the output is powered for just one of the PLC's cycles (a very short time) then the output's own momentary on state will keep itself energized. You want to put in an internal relay conditional between the Y002 input and output or else you'll never be able to get it off! Well you could if you restart the PLC's program or with the computer link protocol.
Rung three is also spread across two rung slots but you could get it on one rung if it would fit ( it really doesn't all fit on one rung in the editor). It's basically like rung one except that between the timers is a data statement that increments D150 by one. There are other ways to increment a data register, but this is what I used. Because it's between the timers, the data function will only get power and operate once during the period of the cycle. Since most of the timers only measure in milliseconds you can use a rung like this to measure time in hours or days if your PLC doesn't have any function that will do it for you.
Rung four simply turns on an output when D150 is greater than a number i.e. a certain amount of time has gone by.
Rung five sets D150 back to 0 when that output has been on momentarily. In a real application of something like this you'd probably want to use a TOF on rung four so that when D150 is no longer greater than 200 Y003 will wait a moment before deactivating, other wise it will deactivate after one cycle of the PLC. The PLC probably goes through around a thousand cycles per second. A cycle is when the PLC updates the on, off, and value states of the relays and registers.
You should notice that I didn't just say D150=0. The = sign is already used in conditionals so instead you have to use a move command. The --[0 MOV D150]-- means move the value of 0 into the register D150. There are many other data functions and ladder logic components that you can use. So far I've only gone over what I think are the most important ones. For example, the T1 also haws its own counters and flip flop's built in to use in your program. Don't be afraid to experiment for your self though. When you buy the starter kit a you get PLC, a ladder logic editor and documentation including a list of all of the programming components, hardware, and exactly how everything works.
by Richard C. Gray
| 3209 W.9th
street Lawrence, KS 66049 USA |
Ph |
(785) 841 3089 (785) 841 3089 inform@xtronics.com https://xtronics.com |
Bookmark this page |